

Setup a communication between modules and MCU or MCUs is so important to exchange data. And as we know from my last posts, we provide this communication using SPI, i2c or UART in basic electronics. In this lesson, we’ll analyze i2c communication between two PSoC devices. Before we begin, let’s look at the fundamentals of i2c.
I2C is a communication method which consists of two line to exchange data. One of them is SDA and the other is SCL. SDA provides us exhange data; on the other hand SCL provides us clock for synchronization. Unfortunately, we can’t exhange data simultanously, such as a SPI communcation. We use this method just for request and response type. You can learn more details from SparkFun, I like their blog articles, they are so easy to understand.
Now, we’ll design hardware, develop main code and analyze the lines(SDA, SCL) using logic analyser.
1. Master Side (Design, Code)
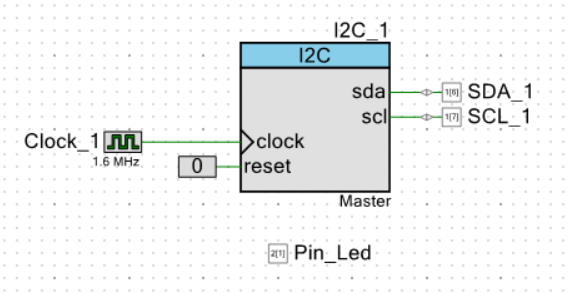
I2C module for master side.

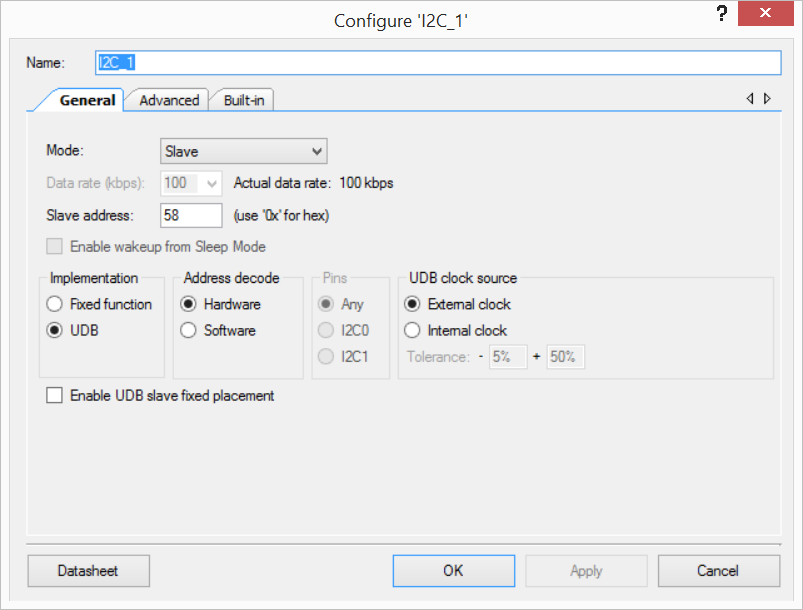
Configuration for master side.
[code]
#include "project.h"
int main(void)
{
CyGlobalIntEnable; /* Enable global interrupts. */
I2C_1_Start();
Clock_1_Start();
Pin_Led_Write(0u);
uint8 masterWBuff[4]={0x0u};
masterWBuff[0]=20;
masterWBuff[1]=21;
masterWBuff[2]=22;
masterWBuff[3]=23;
CyDelay(100u);
uint8 i = 0;
uint8 conn_status= I2C_1_MasterSendStart(58,0);
if(conn_status==I2C_1_MSTR_NO_ERROR){
for(i=0;i<4;i++){
uint8 trans_status=I2C_1_MasterWriteByte(masterWBuff[i]);
}
}
I2C_1_MasterSendStop();
I2C_1_MasterClearReadBuf();
I2C_1_MasterClearWriteBuf();
CyDelay(100); //Optional*. Wait for response if there is. Slave side may be required process time.
conn_status= I2C_1_MasterSendStart(58,I2C_1_READ_XFER_MODE);
if(conn_status==I2C_1_MSTR_NO_ERROR){
for(i=0;i<4;i++){
if(i!=3)
masterWBuff[i]=I2C_1_MasterReadByte(I2C_1_ACK_DATA);
else
masterWBuff[i]=I2C_1_MasterReadByte(I2C_1_NAK_DATA);
}
}
I2C_1_MasterSendStop();
for(;;)
{
/* Place your application code here. */
if(masterWBuff[0]==60)
Pin_Led_Write(1u);
}
}
[/code]
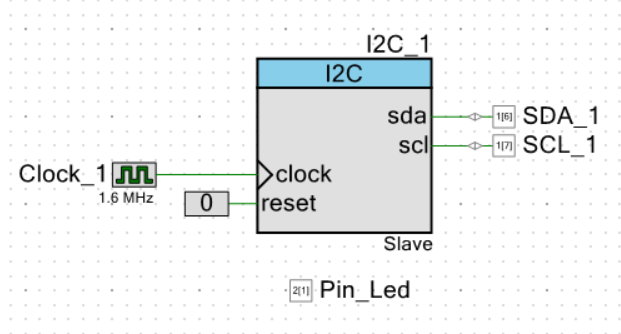
2. Slave Side
[code]
#include "project.h"
int main(void)
{
CyGlobalIntEnable; /* Enable global interrupts. */
Pin_Led_Write(0);
I2C_1_Start();
uint8 slaveRBuff[4]={0x0u};
I2C_1_SlaveInitReadBuf((uint8 *)slaveRBuff,4);
I2C_1_SlaveInitWriteBuf((uint8 *)slaveRBuff,4);
Clock_1_Start();
for(;;)
{
if(0u != (I2C_1_SlaveStatus() & I2C_1_SSTAT_WR_CMPLT))
{
I2C_1_SlaveClearWriteStatus();
/* Place your application code here. */
if(slaveRBuff[0]==20){
Pin_Led_Write(1);
slaveRBuff[0]=40;
slaveRBuff[1]=41;
slaveRBuff[2]=42;
slaveRBuff[3]=43;
}
I2C_1_SlaveClearReadBuf(); //Use this to get data correctly from master side.
//This sets the index value of read buffer.
}
}
}
[/code]
3. Analyse

Master -> Slave (at 577 ms)

Master <- Slave (at 678 ms)
Consequently, it is so easy to exchange data via i2c if you progress step by step. And I think, it is so efficieny for embedded projects, especially for student projects.
Leave a Reply