

As you know MSP430 has different syntax when we compare it with Arduino, its syntax requires the knowledge about bit level operations. And when I wanted to control a LED using a button, it was harder than my Arduino experience. Let me explain why it was harder:
- Software-based pull-up resistor: We need a pull-up or pull-down resistor to prevent floating value on the button. (If you don’t know this term, I strongly advise you to look at it.)
- Syntax: Unlike Arduino codes, it requires bit level operations, and it has lots of pre-defined variables. It is so fun to work with bit operations bu pre-defined variables makes me confused sometimes.
To turn LED on or off, we set-up this circuit:
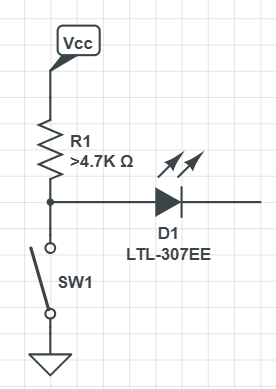
When we press the button, the voltage difference value gets zero and the LED gets off. Our example is based on this circuit, we use MCU instead of the LED so we measure the voltage value at that point, is it zero or not?
Let’s begin. First of all, let’s think about the algorithm quickly. We need a button for input and we have to get the state of the button, then we will process the state and produce an output for the LED or anything.
Important! If we use a button to control something, we always use a pull-up or pull-down circuit to prevent floating values, sometimes they are software-based like in PSoC devices or hardware-based like regular applications. As far as I know and according to this application, MSP430 supports software-based resistors, we’re going to use it.
[code]
#include "io430.h"
int main( void )
{
// Stop watchdog timer to prevent time out reset
WDTCTL = WDTPW + WDTHOLD;
unsigned int i; //delay variable
P1REN |= 0x02; // Enable resistor on P1.1 *[1]
P1OUT = 0x02; // Set resistor to pull-up, P1.0 low
P1DIR = 0x01; // Set P1.0 as output and P1.1 as intput
P4OUT = 0x80; // Set P4.7 high
P4DIR = 0x80; // Set P4.7 as output
while(1)
{
if( !(P1IN & 0x02) ) // If push button is pressed *[2]
{
P1OUT ^= 0x01;
P4OUT ^= 0x80;
for( i=0; i<30000; i++ );
}
}
}
[/code]
* This code block was quoted from here. It’s so easy to understand.
[2] When we press the button, it returns 0 because we have a pull-up connection. So our if condition is like that, you may be confused because of this, but now you know why we used that now 🙂
[1] I removed this line to observe how it behaves. I guess it was affected by the magnetic fields of my finger 🙂 You can watch the video below.
Leave a Reply