


We are a team that develop a model satellite for a competition and we use Arduino for electronic tasks. Sometimes, there are problems about memory using on Arduino and we have to reduce code lines in library using. If we could know how to develop a library for i2c or spi interfaces, we would just wrote a new library for sensors that using memory less so I did some research about this topic and I saw that I know already.
We have to know “Object Oriented Programming” to develop a library for Arduino. I will explain OOP simply for you. In OOP method, we can talk about two things that these are classes and objects. Objects are members of a class. I have a diagram below for simplify.
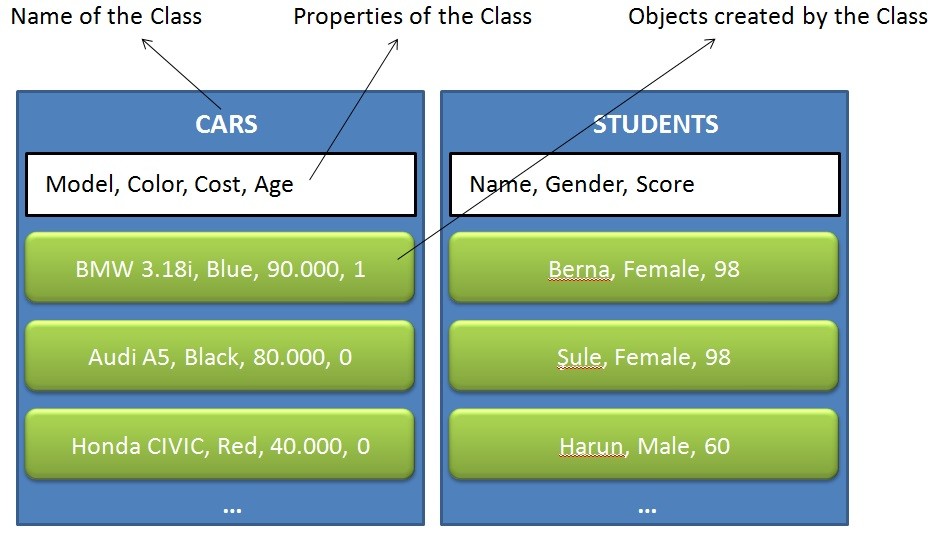
There are two classes in the diagram above, cars and students. If we have a class, we have properties and functions for this class. These properties are using to describe objects. For example, we have multiple cars and we want to store these in object type. For this, we create “cars” class and we define properties for this class like model, color, cost and age. Then, we can create an object using this class like the code line(it changes by the language) below:
car_1 = new Cars(“BMW 3.18i” , “Blue” , “90.00” ,1)
So that, we can create objects and use these objects when we want. You should do some research about OOP, I’m sure that you will like this. Now, we will learn that how to use OOP in developing Arduino library.
We will develop a library for LED blink. It’s easy and simple. First of all, we need to two files that header file and source file.
File 1: MyLibrary.h

File 2: MyLibrary.cpp
.h file is for declarations of classes, functions, variables; .cpp file is for implementation(algorithm).
#ifndef MyLibrary_h
#define MyLibrary_h

#include "Arduino.h"

class BlinkLED
{
  public:
    BlinkLED(int pin);
    void on();
    void off();
  private:
    int _pin;
};

#endif
We defined our variables that will be used. Now, we will write code blogs for these variables.
#include "Arduino.h"
#include "MyLibrary.h"

BlinkLED::BlinkLED(int pin)
{
  pinMode(pin, OUTPUT);
  _pin = pin;
}

void BlinkLED::on()
{
  digitalWrite(_pin, HIGH);
}

void Morse::off()
{
  digitalWrite(_pin, LOW);
}

void blinkAutomatically{
  digitalWrite(_pin, HIGH);
  delay(1000);
  digitalWrite(_pin, LOW);
  delay(1000);
}
It’s that easy. Now, the last step, we will use this library in our Arduino code.
#include <MyLibrary.h>

BlinkLED blinkLED(13);

void setup()
{
}

void loop()
{
  blinkLed.on();
  delay(1000);
  blinkLed.off();
  delay(1000);
  blinkLed.blinkAutomatically();
}
You see, you can use on() and off() methods or blinkAutomatically() method 🙂
Thus, we don’t need write some lines multi times like “digitalWrite(_pin, HIGH)” to set pin values. We just call a method like “blinkAutomatically() or on()/off()”. Actually, there are lots of important advantages but this article is a 101 example 🙂 it’s enough for now.
SOURCES
https://www.arduino.cc/en/Hacking/LibraryTutorial
Leave a Reply